9-10 7 views
一、环境说明
1.1 系统及组件版本
OS:CentOS7
Kernel: 4.44
Docker: 19.04
kubectl: 1.15.1
kubernetes: 1.15.1
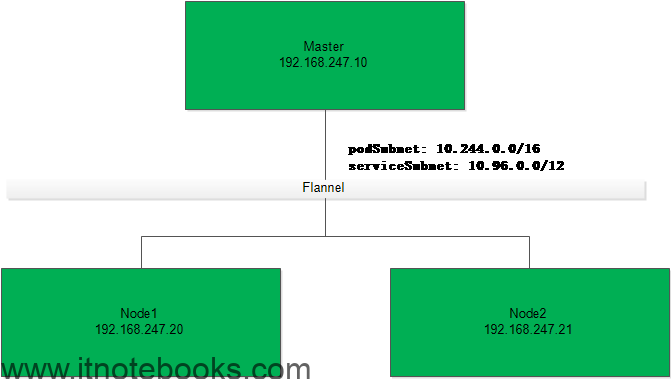
1.2 部署架构
1.2.1 Master
IP: 192.168.247.10
Hostname: k8s-master01
1.2.2 Node
IP: 192.168.247.20
Hostname: k8s-node01
IP:192.168.247.21
Hostname: k8s-node02
二、初始化配置
2.1 设置主机名
2.1.1 Master节点
|
1 2 3 4 5 6 7 |
hostnamectl set-hostname k8s-master01 cat >> /etc/hosts << EOF 192.168.247.10 k8s-master01 192.168.247.20 k8s-node01 192.168.247.21 k8s-node02 EOF |
2.1.2 Node01节点
|
1 2 3 4 5 6 |
hostnamectl set-hostname k8s-node01 cat >> /etc/hosts << EOF 192.168.247.10 k8s-master01 192.168.247.20 k8s-node01 192.168.247.21 k8s-node02 |
2.1.3 Node02节点
|
1 2 3 4 5 6 |
hostnamectl set-hostname k8s-node02 cat >> /etc/hosts << EOF 192.168.247.10 k8s-master01 192.168.247.20 k8s-node01 192.168.247.21 k8s-node02 |
2.2 安装依赖组件
|
1 |
yum install -y conntrack ntpdate ntp ipvsadm ipset jq iptables curl sysstat libseccomp wget vim net-tools git |
2.3 设置防火墙
在K8S中,kube-proxy其主要工作之一就是通过iptables策略来实现的service到pod的访问,Calico网络的主机间的路由转发也是基于iptables的路由策略实现。这是非常主要的一环
|
1 2 |
systemctl stop firewalld && systemctl disable firewalld yum -y install iptables-services && systemctl start iptables && systemctl enable iptables && iptables -F && service iptables save |
2.4 关闭SELINUX和swap
kubeadm在进行init时会检测swap分区有没有关闭
|
1 2 |
swapoff -a && sed -i '/ swap / s/^\(.*\)$/#\1/g' /etc/fstab setenforce 0 && sed -i '/SELINUX=/s/enforcing/disabled/' /etc/selinux/config |
2.4 调整内核参数
|
1 2 3 4 5 6 7 8 9 10 11 12 13 14 15 16 17 18 |
cat > kubernetes.conf << EOF net.bridge.bridge-nf-call-iptables=1 net.bridge.bridge-nf-call-ip6tables=1 net.ipv4.ip_forward=1 net.ipv4.tcp_tw_recycle=0 vm.swappiness=0 # 禁止使用swap空间,只有当系统OOM时才允许使用它 vm.overcommit_memory=1 # 不检查物理内存是否够用 vm.panic_on_oom=0 # 开启OOM fs.inotify.max_user_instances=8192 fs.inotify.max_user_watches=1048576 fs.file-max=52706963 fs.nr_open=52706963 net.ipv6.conf.all.disable_ipv6=1 net.netfilter.nf_conntrack_max=2310720 # 内核升级到4.0以上就会有了 EOF cp kubernetes.conf /etc/sysctl.d/kubernetes.conf sysctl -p /etc/sysctl.d/kubernetes.conf |
2.5 调整系统时区
|
1 2 3 4 5 6 7 8 9 |
# 设置系统时区为亚洲/上海 timedatectl set-timezone Asia/Shanghai # 将当前的UTC时间写入硬件时钟 timedatectl set-local-rtc 0 # 重启依赖于系统时间的服务 systemctl restart rsyslog systemctl restart crond |
2.6 设置rsyslogd 和systemd journal
CentOS7开始默认会有2个日志服务在同时工作,我们关闭其中一个
|
1 2 3 4 5 6 7 8 9 10 11 12 13 14 15 16 17 18 19 20 21 22 23 24 25 26 27 28 29 30 |
mkdir /var/log/journal #持久化保存日志的目录 mkdir /etc/systemd/journald.conf.d cat > /etc/systemd/journald.conf.d/99-prophet.conf << EOF [Journal] # 持久化保存到磁盘 Storage=persistent # 压缩历史日志 Compress=Yes SyncIntervalSec=5m RateLimitInterval=30s RateLimitBurst=1000 # 最大占用空间 10G SystemMaxUse=10G # 单日志文件最大 200M SystemMaxFileSize=200M # 日志保存时间 2 周 MaxRetentionSec=2week # 不将日志转发到 syslog ForwardToSyslog=no EOF systemctl restart systemd-journald |
2.7 关闭系统不需要的服务
|
1 |
systemctl stop postfix && systemctl disable postfix |
2.8 升级系统内核
CentOS 7.x系统自带的3.10.x内核存在一些Bugs,导致运行的Docker、Kubernetes不稳定
|
1 2 3 4 5 6 7 8 9 10 |
rpm -Uvh http://www.elrepo.org/elrepo-release-7.0-3.el7.elrepo.noarch.rpm # 安装完成后检查 /boot/grub2/grub.cfg 中对应内核menuentry中是否包含initrd16配置,如果没有,再安装一次 yum --enablerepo=elrepo-kernel install -y kernel-lt # 设置开机从新内核启动 grub2-set-default "CentOS Linux (4.4.197-1.el7.elrepo.x86_64) 7 (Core)" # 重启系统 reboot |
重启后确认内核版本
|
1 |
uname -r |
2.9 为kube-proxy开启ipvs
在新版本的K8S中service已经支持通过lvs的调试方式,这里开启ipvs的前置条件
|
1 2 3 4 5 6 7 8 9 10 11 12 13 |
modprobe br_netfilter cat > /etc/sysconfig/modules/ipvs.modules <<EOF #!/bin/bash modprobe -- ip_vs modprobe -- ip_vs_rr modprobe -- ip_vs_wrr modprobe -- ip_vs_sh modprobe -- nf_conntrack_ipv4 EOF chmod 755 /etc/sysconfig/modules/ipvs.modules && bash /etc/sysconfig/modules/ipvs.modules && lsmod | grep -e ip_vs -e nf_conntrack_ipv4 |
三、Docker
3.1 安装Docker
3.1.1 加载阿里云的镜像源
|
1 2 3 4 5 |
yum install -y yum-utils device-mapper-persistent-data lvm2 yum-config-manager \ --add-repo \ http://mirrors.aliyun.com/docker-ce/linux/centos/docker-ce.repo |
3.1.2 更新并安装Docker
|
1 2 3 4 |
yum update -y yum install -y docker-ce reboot |
3.1.3 再次调整内核启动顺序,从4.4启动
更新后会回到系统中默认更新的比较新的内核,所以更新后需要再次设置内核启动顺序
|
1 2 3 4 5 |
uname -r grub2-set-default "CentOS Linux (4.4.197-1.el7.elrepo.x86_64) 7 (Core)" reboot |
3.2 配置Docker运行环境
3.2.1 创建 /etc/docker 目录
|
1 |
mkdir /etc/docker |
3.2.2 设置docker开机启动
|
1 2 |
systemctl start docker systemctl enable docker |
3.2.3 配置 daemon
默认centos7中会有2个cgroup组件[cgroupfs,systemd管理的cgroup],为了统一,这里设置使用systemd管理的cgroup来进行cgroup的隔离
这里并设储存日志的方式改成json-file,并设置大小为100m
后期可以通过/var/log/contrains目录下查看容器的日志
|
1 2 3 4 5 6 7 8 9 |
cat > /etc/docker/daemon.json << EOF { "exec-opts": ["native.cgroupdriver=systemd"], "log-driver": "json-file", "log-opts":{ "max-size":"100m" } } EOF |
3.2.4 创建存放docker生成的子配置的目录
|
1 2 3 |
mkdir -p /etc/systemd/system/docker.service.d # 重启docker服务 systemctl daemon-reload && systemctl restart docker && systemctl enable docker |
四、kubeadm
4.1 安装kubeadm
4.1.1 配置阿里云的镜像源
|
1 2 3 4 5 6 7 8 9 10 |
cat << EOF > /etc/yum.repos.d/kubernetes.repo [kubernetes] name=Kubernetes baseurl=http://mirrors.aliyun.com/kubernetes/yum/repos/kubernetes-el7-x86_64 enable=1 gpgcheck=0 repo_gpgcheck=0 gpgkey=http://mirrors.aliyun.com/kubernetes/yum/doc/yum-key.gpg http://mirrors.aliyun.com/kubernetes/yum/doc/rpm-package-key.gpg EOF |
4.1.2 安装
|
1 |
yum -y install kubeadm-1.15.1 kubectl-1.15.1 kubelet-1.15.1 |
4.1.3 设置kubelet开机启动
|
1 |
systemctl enable kubelet.service |
4.2 Master节点初始化
4.2.1 导出配置初始化配置
|
1 |
kubeadm config print init-defaults > kubeadm-config.yaml |
4.2.2 修改配置文件
vim kubeadm-config.yaml
|
1 2 3 4 5 6 |
localAPIEndpoint: advertiseAddress: 192.168.247.10 # master的IP kubernetesVersion: v1.15.1 # 跟自己安装的版本号保持一致 networking: podSubnet: "10.244.0.0/16" # 添加此条,跟网络组件保持一致,这里添加的是flannel的默认网段 serviceSubnet: "10.96.0.0/12" |
4.2.3 添加启用lvs的配置
vim kubeadm-config.yaml
|
1 2 3 4 5 6 |
--- apiVersion: kubeproxy.config.k8s.io/v1alpha1 # 启用lvs kind: KubeProxyConfiguration featureGates: SupportIPVSProxyMode: true mode: ipvs |
4.2.4 初始化
–experimental-upload-certs 从1.13版本开始,自动颁发证书
|
1 |
kubeadm init --config=kubeadm-config.yaml --experimental-upload-certs | tee kubeadm-init.log |
看到如下提示表示初始化成功,根据提示执行即可
|
1 2 3 4 5 6 7 8 9 10 11 12 13 14 15 16 |
Your Kubernetes control-plane has initialized successfully! To start using your cluster, you need to run the following as a regular user: mkdir -p $HOME/.kube sudo cp -i /etc/kubernetes/admin.conf $HOME/.kube/config sudo chown $(id -u):$(id -g) $HOME/.kube/config You should now deploy a pod network to the cluster. Run "kubectl apply -f [podnetwork].yaml" with one of the options listed at: https://kubernetes.io/docs/concepts/cluster-administration/addons/ Then you can join any number of worker nodes by running the following on each as root: kubeadm join 192.168.247.10:6443 --token abcdef.0123456789abcdef \ --discovery-token-ca-cert-hash sha256:26c7af65a7603badd854d389d3bb3650c45ee667344d541d01fd2101fd628ea4 |
根据提示执行
|
1 2 3 |
mkdir -p $HOME/.kube sudo cp -i /etc/kubernetes/admin.conf $HOME/.kube/config sudo chown $(id -u):$(id -g) $HOME/.kube/config |
查看节点状态
|
1 2 3 4 5 |
kubectl get node ``` NAME STATUS ROLES AGE VERSION k8s-master01 NotReady master 3m39s v1.15.1 ``` |
这里可以看到master节点的STATUS目前还是NotReady的状态,这是因为还没有部署网络组建的原因,我可以看以看到初始化信息中也有提示
|
1 2 3 |
You should now deploy a pod network to the cluster. Run "kubectl apply -f [podnetwork].yaml" with one of the options listed at: https://kubernetes.io/docs/concepts/cluster-administration/addons/ |
4.2.5 安装Flannel网络组件
下载Flannel的部署脚本
|
1 |
wget https://raw.githubusercontent.com/coreos/flannel/master/Documentation/kube-flannel.yml |
安装Flannel
|
1 |
kubectl create -f kube-flannel.yml |
这个过程会比较久,可以通过watch监视其状态
|
1 |
kubectl get pod -n kube-system -w |
我们再来查看Master节点的状态
kubectl get node -o wide
|
1 2 |
NAME STATUS ROLES AGE VERSION INTERNAL-IP EXTERNAL-IP OS-IMAGE KERNEL-VERSION CONTAINER-RUNTIME k8s-master01 Ready master 5m v1.15.1 192.168.247.10 <none> CentOS Linux 7 (Core) 4.4.197-1.el7.elrepo.x86_64 docker://19.3.4 |
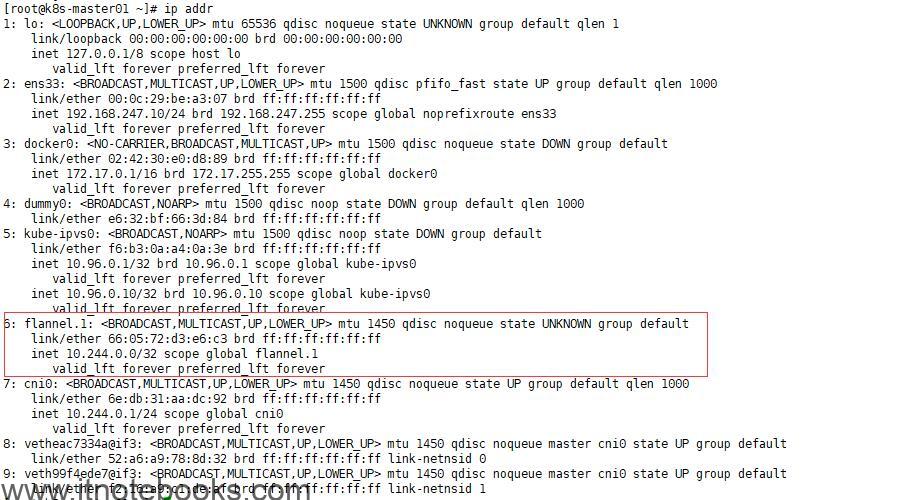
安装完成后,系统中会出来一个flannel.1的网络,其网段是10.244.0.0

4.3 Node节点加入集群
这里直接在Node节点上执行Master初始化时最后提示的那句指令即可
|
1 2 3 4 |
Then you can join any number of worker nodes by running the following on each as root: kubeadm join 192.168.247.10:6443 --token abcdef.0123456789abcdef \ --discovery-token-ca-cert-hash sha256:26c7af65a7603badd854d389d3bb3650c45ee667344d541d01fd2101fd628ea4 </pre> |
4.3.1 执行kubeadm join
在Node01和Node02节点上执行
kubeadm join 192.168.247.10:6443 –token abcdef.0123456789abcdef –discovery-token-ca-cert-hash sha256:26c7af65a7603badd854d389d3bb3650c45ee667344d541d01fd2101fd628ea4
|
1 2 3 4 5 6 7 8 9 10 11 12 13 14 15 |
[preflight] Running pre-flight checks [WARNING SystemVerification]: this Docker version is not on the list of validated versions: 19.03.4. Latest validated version: 18.09 [preflight] Reading configuration from the cluster... [preflight] FYI: You can look at this config file with 'kubectl -n kube-system get cm kubeadm-config -oyaml' [kubelet-start] Downloading configuration for the kubelet from the "kubelet-config-1.15" ConfigMap in the kube-system namespace [kubelet-start] Writing kubelet configuration to file "/var/lib/kubelet/config.yaml" [kubelet-start] Writing kubelet environment file with flags to file "/var/lib/kubelet/kubeadm-flags.env" [kubelet-start] Activating the kubelet service [kubelet-start] Waiting for the kubelet to perform the TLS Bootstrap... This node has joined the cluster: * Certificate signing request was sent to apiserver and a response was received. * The Kubelet was informed of the new secure connection details. Run 'kubectl get nodes' on the control-plane to see this node join the cluster. |
4.3.1 在Master节点上查看Node节点状态
|
1 2 3 4 5 |
kubectl get node -o wide NAME STATUS ROLES AGE VERSION INTERNAL-IP EXTERNAL-IP OS-IMAGE KERNEL-VERSION CONTAINER-RUNTIME k8s-master01 Ready master 20m v1.15.1 192.168.247.10 <none> CentOS Linux 7 (Core) 4.4.197-1.el7.elrepo.x86_64 docker://19.3.4 k8s-node01 Ready <none> 11m v1.15.1 192.168.247.20 <none> CentOS Linux 7 (Core) 4.4.197-1.el7.elrepo.x86_64 docker://19.3.4 k8s-node02 Ready <none> 12m v1.15.1 192.168.247.21 <none> CentOS Linux 7 (Core) 4.4.197-1.el7.elrepo.x86_64 docker://19.3.4 |
4.3.2 在Master节点上查看所有Pod状态
kubectl get pod -n kube-system -o wide
|
1 2 3 4 5 6 7 8 9 10 11 12 13 |
NAME READY STATUS RESTARTS AGE IP NODE NOMINATED NODE READINESS GATES coredns-5c98db65d4-2tszt 1/1 Running 4 23m 10.244.0.9 k8s-master01 <none> <none> coredns-5c98db65d4-tpkxv 1/1 Running 3 23m 10.244.0.8 k8s-master01 <none> <none> etcd-k8s-master01 1/1 Running 5 23m 192.168.247.10 k8s-master01 <none> <none> kube-apiserver-k8s-master01 1/1 Running 4 23m 192.168.247.10 k8s-master01 <none> <none> kube-controller-manager-k8s-master01 1/1 Running 4 23m 192.168.247.10 k8s-master01 <none> <none> kube-flannel-ds-amd64-nspvj 1/1 Running 2 5m 192.168.247.20 k8s-node01 <none> <none> kube-flannel-ds-amd64-rp6tm 1/1 Running 3 5m 192.168.247.21 k8s-node02 <none> <none> kube-flannel-ds-amd64-xs58r 1/1 Running 4 23m 192.168.247.10 k8s-master01 <none> <none> kube-proxy-2djcv 1/1 Running 4 10m 192.168.247.21 k8s-node02 <none> <none> kube-proxy-d4p8k 1/1 Running 4 23m 192.168.247.10 k8s-master01 <none> <none> kube-proxy-vljgj 1/1 Running 3 10m 192.168.247.20 k8s-node01 <none> <none> kube-scheduler-k8s-master01 1/1 Running 5 23m 192.168.247.10 k8s-master01 <none> <none> |

